
In Azure Portal you can upload and download block blobs in Azure storage container.
Before starting to upload files in azure storage container, you must have an azure storage account. If you do not know how to create an azure storage account, see here: Create a storage account in Microsoft Azure.
Follow these steps to upload files to azure storage container
Step-1: Login into the Azure Portal https://portal.azure.com/
Step-2: Create a container, If you do not know how to create a container, see here: Create a Container then click on container and open it.

Step-3: Now click to upload button.

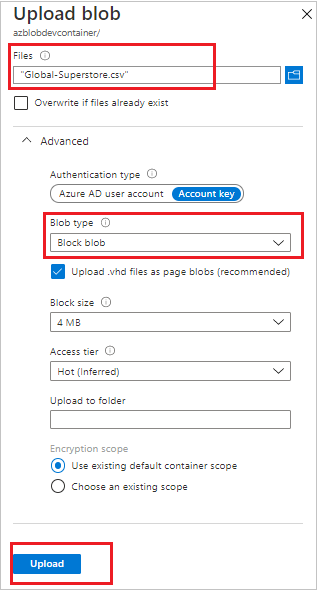
Step-4: A Upload blob window opens at the right corner of window screen. And Select files that you want to upload in storage container.

Step-5: You can define blob type & file size in case if you are uploading a large file otherwise leave fields with default suggestion. Then click on Upload button.
Step-6: Now you can see the uploaded files in grid cell.

How to Download/ View/ Delete file
Click to ellipsis(three dot) icon of file.

Note: There is a limit of editing file in Azure portal. You can just edit a file in portal which size is under 2.1MB.
Recommend Azure Post: Microsoft Azure Topics
Hope you enjoyed the post. Your valuable feedback, question, or comments about this post are always welcome or you can leave us message on our Contact form , we will revert to you asap.
![]()