
Personalize visuals allows to end users to change existing visuals with new visuals as per their need.
They can adjust the visual the way they want, and save it as a bookmark to come back to.
They don’t need to have edit permission for the report, or to go back to the report author for a change.
Prerequisites for this – Update or download the latest version of Power BI from the official Microsoft website.
https://powerbi.microsoft.com/en-us/downloads/
Let’s start with an example:
Step 1: To enable “Personalize visuals for the report,” follow these steps:
- Click on the “File” tab in the Power BI file.
- Select “Options & Settings.”
- Choose “Options.”

Step-2:Under Current file, select Reporting settings, and check the Personalize visuals option, then click ‘OK’.

Step-3: Now, hover the mouse over the visual, and you will see the ‘Personalize Visual’ icon.

Step-4: Now publish the report to Power BI Service.
Step-5: Open the report in Power BI Service, hover the mouse over the report, and click on the Personalize icon.
One Personalize pane will populate, and you will see several options there.

Step -6: Now, the end user can change the existing visual type by selecting a new visual from the ‘Visualization Type’ drop-down menu.

Step-7: Users can also add new fields for further analysis. To do this, click the ‘+’ icon, and the dataset will become visible. From there, select the fields you want to add.

Step-8: To remove fields from visuals, click on the ellipsis icon (three-dot icon), and then select ‘Remove fields’.
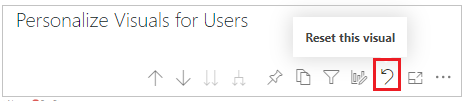
Step-9: To reset the new visual changes with the existing visual, click the reset icon.
Step-10: Users can save the new changes in the form of a bookmark so that they can view the updated content anytime by clicking the bookmark name.

Step-11: Now, refresh the page and navigate to the ‘Bookmarks’ tab. Then, select the bookmark by its name.

How to mange all visuals to be personalized?
If you don’t want all the visuals to be personalized, you can enable or disable the setting for each individual visual.
Select the visual > Go to the Format pane > Visual header > Turn off Personalize visual.


Hope you enjoyed the post. Your valuable feedback, question, or comments about this post are always welcome or you can leave us message on our contact form , we will revert to you asap.
![]()