A dataflow is a collection of tables that are created and managed in workspaces in the Power BI service. A table is a set of columns that are used to store data, much like a table within a database. You can add and edit tables in your dataflow, and manage data refresh schedules, directly from the workspace in which your dataflow was created.
It allows users to connect to various data sources, transform and cleanse the data using Power Query, and then store it in a centralized data storage called the Common Data Model (CDM) within the Power BI service.
Where to Create Dataflows:
Dataflows are created directly within the Power BI service (https://app.powerbi.com). To access the dataflows, log in to your Power BI account and navigate to your workspace. From there, you can create, manage, and share dataflows.
Usage of Dataflows:
- Data Centralization: Dataflows provide a centralized location to store and manage data, making it easier to maintain and ensure data consistency across reports and datasets.
- Data Transformation: Power Query Editor, which is used within dataflows, offers powerful data transformation capabilities. Users can clean, filter, aggregate, and enrich the data before it is loaded into the data model.
- Data Reusability: Once a dataflow is created, it can be reused in multiple datasets and reports. This promotes a single source of truth and reduces duplication of data transformation efforts.
- Data Governance and Security: Dataflows support role-level security (RLS) and help enforce data governance policies. Users can control data access based on user roles, ensuring sensitive data is restricted only to authorized users.
- Scheduled Data Refresh: Dataflows can be scheduled for periodic data refreshes, ensuring that the data is always up-to-date with the source.
- Enhanced Collaboration: Dataflows enable collaboration among team members. Users can share dataflows with others, allowing different teams to work with the same cleansed and transformed data.
Step-by-Step Guide to Creating a Dataflow:
1- Create a New Dataflow:
- In the Power BI service, go to the desired workspace and click on “New” in the left navigation pane.
- Choose “Dataflow” from the menu to create a new dataflow.

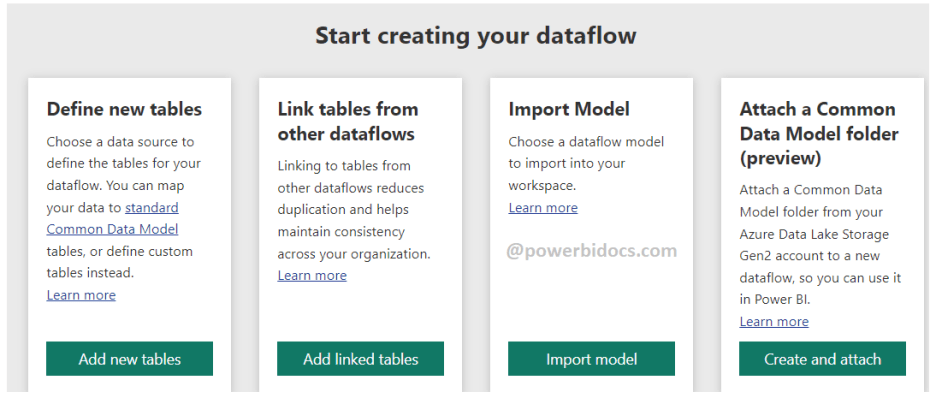
2- There are multiple ways to create or build on top of a new dataflow:
In this example you will see how to create a data flow through new tables> click on “Add new tables”.

3- Connect to Data Source:
- Select the data source you want to connect to (e.g., Excel, SharePoint, SQL Server, etc.).

- Click on Excel workbook > after that you can upload the file through OneDrive or your machine.

- Now click on Edit connection and follow the authentication steps to access the data source.
- After that click on Next button.
4- Transform Data using Power Query Editor:
- Choose the sheet which you want to load > click on Transform Data.
- Use the Power Query Editor to clean, filter, transform, and aggregate the data from the data source.
- Apply necessary data type conversions and enrich the data as needed.
5- Save and Load Dataflow:
Click on “Close & Apply” to save and load the dataflow.
Choose a name and description for the dataflow.

6- Schedule Data Refresh:
- Once the dataflow is published, go to the workspace containing the dataflow.
- Hover the cursor to dataflow name > click on three dot icon(…) > and then click on “Settings.”
- Under “Dataflow settings,” set up a schedule for data refresh.
7- Use the Dataflow in Reports and Dashboards:
- In Power BI Desktop or the Power BI service, create a new report.
- Click on “Get Data” and select “Dataflows.”
- Choose the dataflow you created to use its data in your report.

Refer Power BI other post: Power BI tutorials
![]()