
In this blog, I will explain Apps in Power BI—how you can create an app, publish or unpublish the app, and manage permissions.
What are Power BI Apps?
Power BI Apps are a powerful way to bundle and distribute dashboards, reports, and datasets to a large audience in a managed and secure way. Instead of sharing individual reports one by one, you can group them into an app and distribute it to your organization. Power BI Apps provide a clean and organized way for end-users to access only the content they need.
Key Benefits of Power BI Apps:
- Centralized access to multiple reports and dashboards.
- Easier distribution and management of content.
- Secure sharing with defined permissions.
- Ability to update content without disturbing end-users.
Who Can Create, Publish, and Unpublish Power BI Apps?
1- Create and Publish Apps:
- Admin and Member roles in a Power BI workspace can create, publish, update, unpublish, and manage permissions for an app.
- Contributor role can update an app ONLY if the admin has allowed them to do so—but they can’t create, publish, or manage permissions for the app.
2- Unpublish Apps:
- Only Admin and Member roles have the right to unpublish an app.
3- View and Access Apps:
- Users with the correct permissions assigned in the app settings can view and interact with the app content.
How to Create a Power BI App
Follow these steps to create a Power BI App:
Step-1: Publish Reports to Power BI Service:
Open your Power BI Desktop report and publish it to the Power BI Service workspace.
Step-2: Go to the Workspace:
In Power BI Service, navigate to the workspace where your reports and dashboards are published.

Step-3: Select ‘Create App’:
Click on the ‘Create App’ button at the top-right of the workspace.
Step-4: Configure the App:
Setup: Add the app name, description, and a logo (optional).

Content: Choose which reports and dashboards to include in the app.
Click on “Add Content”, then select the reports and dashboards you want to include in the app.

Hide/unhide the content:

Audience: Specify who can access the app – individual users, security groups, or entire organizations.
Advanced Section: This is optional — check this option only if you want to allow people to share the datasets or build content for this app audience.
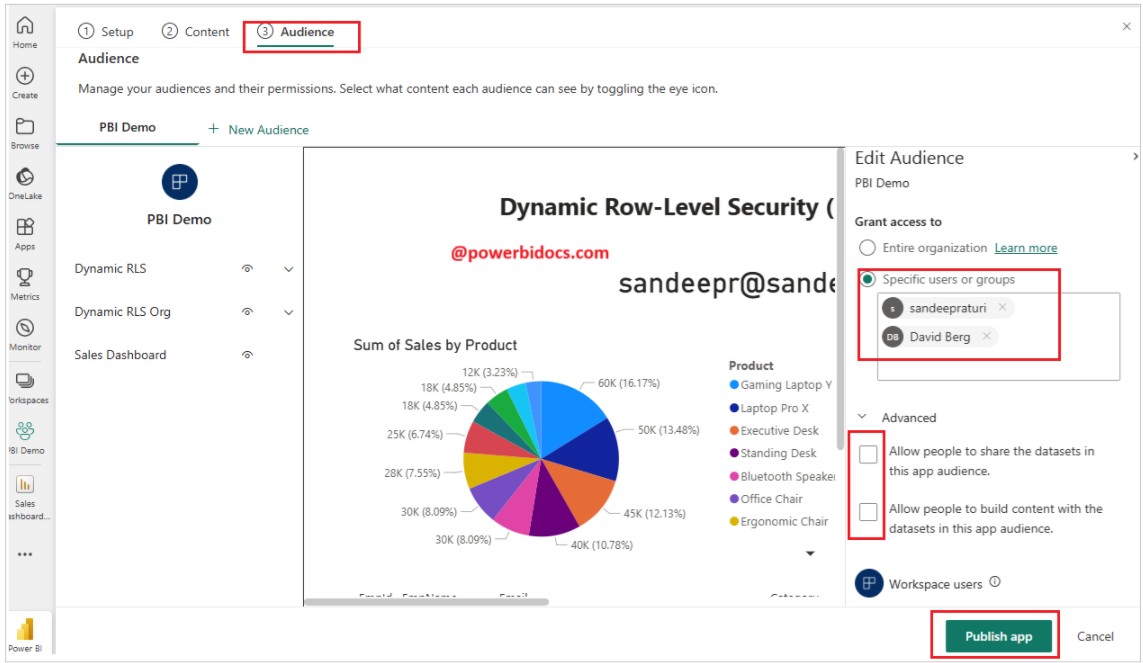
Step-5: Publish the App: Once everything is set, click ‘Publish App’. Your Power BI App is now ready and accessible to the specified users.

How many apps can we create in one Power BI workspace?
In Power BI, you can create only one app per workspace.
A workspace acts as a container where you build and manage reports, dashboards, and datasets. From that workspace, you can package everything into a single app for easy sharing and access.
If you need multiple apps, you will have to create multiple workspaces, with each workspace having its own separate app.
How to Install and Share Power BI Apps
To Install Power BI Apps:
In Power BI Service, click on ‘Apps’ from the left navigation panel. Click on ‘Get Apps’, search for the app you want to install, and click on Get it now.

To Share Power BI Apps:
1- Access through Power BI Service:
- Users can also find the app in the ‘Apps’ section of the Power BI Service.

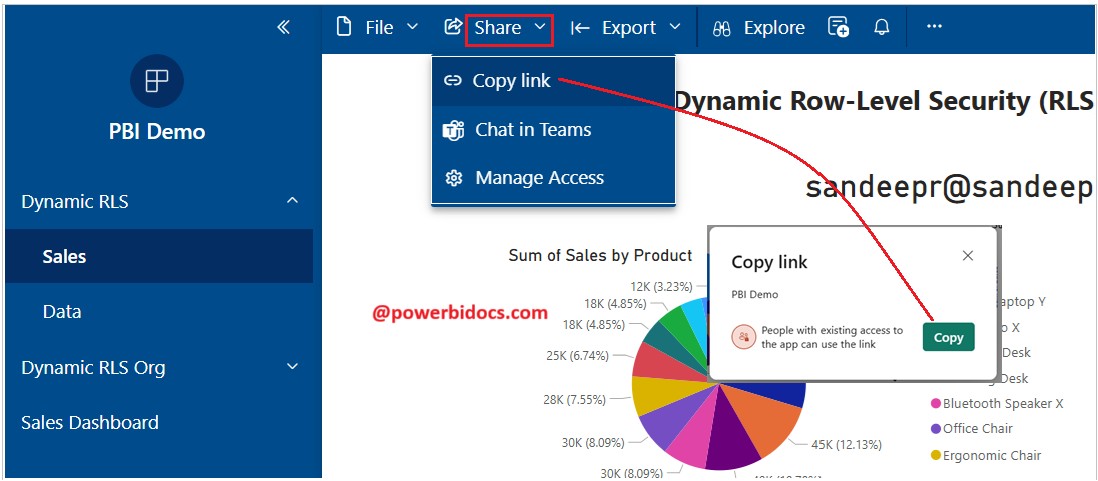
2- Copy App Link:
- Go to the Apps tab, open the app, go to Share, click on Copy link, and copy the URL.
- Share the link with users through email, chat, or any communication channel.
How to Add or Remove Content from Power BI Apps
Step- 1: Go to the Workspace: Open the Power BI Service and navigate to the workspace of your app.
Step-2: Update the App: Click on ‘Update App’ in the top-right corner.

Step-3: Modify Content: Add new reports, dashboards, or datasets by selecting them.
Step-4: Remove existing content by deselecting it.
Step-5: Save and Publish: After making changes, click ‘Update App’ to apply the modifications.

How to Manage Permissions
Step-1: Go to the Apps, click on the three dots, and select ‘Manage permissions’.

Step-2: Add Users or Groups:
Enter email addresses of individuals or security groups who should access the app.

Step-3: Manage Audience: Go to the Apps, click on the three dots next to the app name, and select ‘Manage permissions’. Then, select ‘Manage audiences’.

Set Access Levels: Choose whether users can only view the content or have build permissions to create their own reports from the dataset.

Step-4: Update Permissions:
Click ‘Update App’ to save changes.
Thanks for reading this post! I hope you found it helpful. Feel free to share it with others or your teammates so they can benefit from it too. 😊
![]()